100 Contractor Suggestions to Read Before You Remodel

The contractor-homeowner connection can be challenging, but it is not hopeless — comprehending the process can help you to get the most from your remodeling job. Take a look at the tips and suggestions I’ve picked up from my years of working as a builder and set into 10 remodeling manuals. Here are links to them all, compiled all in one place.

A number of these topics generated great discussions, also, so I encourage you to read the comments on each — they are a testament to the wealth of professional and homeowner comprehension on .

1. Top 10 Remodeling Don’ts. Here I focused on things which make remodeling projects a disaster. Everything comes down to planning: Plan your work and work your plan. And do not change your brain too much.

Get these 10 builder hints

2. How to Shop for Your Remodel. This was all about the fairly stuff — the substances. Be certain that the things that you put into your remodel are still fairly and performing their job for years to find understanding about possible pitfalls and much more.

Get these 10 builder hints

3. Things to Look for in a Contractor’s Contract. You didn’t buy your house by registering one sheet of paper or shaking a stranger’s hand. This ideabook informs you what ought to be on the contract until you pay someone to change your home.

Get these 10 builder hints

4. What Your Contractor Truly Means. This ideabook discusses a big source of frustration for homeowners working with contractors: communication. Discover how to read between the lines, and you and your builder will both get more from the connection.

Get these 10 builder hints

5. Ten Home Places That Probably Need a Guru. Even if you’re a die-hard DIYer, you will find instances when it is safer, smarter and less expensive to hire a pro compared to tackle the job yourself. This report lets you know when to say when.

Get these 10 builder hints

6. Ten Hats Your General Contractor Wears. “Contractor” is a fairly general term. From plumbers to the men and women who manage security details once the country is in war, we now call all of them contractors. And what is more general than a general contractor? Part 6 shows you the functions a GC plays on work.

Get these 10 builder hints

Buckminster Green LLC

7. Ten Ways to Get the Remodel You Need for Less. Remodeling always costs more than you think. Part 7 provides approaches to get more bang for bread.

Get these 10 builder hints

8. Ten Remodel Surprises to Watch Out For. Just when you thought you had everything planned and budgeted for, an unanticipated problem pops up. Put aside a contingency fund and also examine this ideabook to find out common sources of unexpected cost increases.

Get these 10 builder hints

9. Ten Ways to Remodel Greener. I got into this business because I love homes, but I strive to construct green because I’ve seen what a wasteful process building can be. In this setup you’ll be able to learn some tried and true tactics to construct green.

Get these 10 builder hints

10. Ten Things Your Contractor Might Not Tell You. I’ll be honest — following writing about 90 things I’ve discovered, I was tapped out. I needed to begin telling you the things we’re not supposed to tell you. This ideabook will allow you to know what your builder is really thinking.

Get these 10 builder hints

Inform us What did you learn from your remodel?

See related

Kitchen Sinks: Stainless Steel Shines for Affordability and Strength

Stainless steel is always among the most popular materials for kitchen sinks, and for good reason. When it comes to cleaning customs and durability with a selection of cheap options, it is king.

Know the basics and prices here to see if this glistening sink material can work in your dwelling.

Atmosphere Interior Design Inc..

The basics: Stainless steel kitchen sinks contain nickel and chromium, materials which make them truly stainless and resistant to rust. The sinks include varying thicknesses: 16 gauge (thicker and higher in quality) to 22 gauge (thinner and less expensive).

Cost: $100 to $600 average. However, prices can go up dramatically up to $2,000 or even more — for premium steel, a thicker gauge and more complicated sink designs.

Michael Merrill Design Studio, Inc

Benefits: Stainless steel sinks come in a broad range of sizes and shapes, and can be made very large and deep.

Based on the gauge, stainless steel durability can endure the test of time. In reality, hot pots and pans can be loaded directly into a stainless steel kitchen sink without damaging its surface. Fragile dishes will also be less likely to break if dropped into a stainless steel sink, since it is not as hard as rock.

Aesthetically, these sinks enable for cohesiveness in finishes, since so many modern appliances are stainless steel.

ExpressDecor

Kraus KHF203-36-KPF2120-SD20 36 inch Farmhouse Stainless Steel Sink And Faucet

Disadvantages: Not all stainless steel sinks are all made equal. The thicker the steel, the more durable the sink. Thin stainless steel sinks are somewhat more likely to dent, scratch and even rust when the finish wears off.

Stainless steel sinks are also a tad noisy — some may call for sound-deadening pads. These insulating pads are installed on the underside and sides of the sink to absorb noise, protect against condensation and maintain the temperature of water.

TTM Development Company

Yvonne McFadden LLC

Sustainability: Stainless steel is readily recycled and repurposed. Steel is the priciest recycled material from the United States, so it’s easy to find stainless steel sinks made from recycled materials.

ExpressDecor

Kraus KHF200-36 36 inch Farmhouse Single Bowl 16 Guage Stainless Steel Sink

Care: As its name suggests, stainless steel does not stain and can be easily maintained without specific cleansers. But if you would like to get your sink particularly glistening, a gentle – to medium-bristled brush along with a somewhat abrasive cleaner like Bar Keeper’s Friend will do just fine.

Jeanne Finnerty Interior Design

Are you really a fan of the stainless steel kitchen sink? Let’s discuss! Share your ideas in the Comments section below.

Read stainless steel sinks at the Products section

More: Pros and cons of aluminum sinks

See related

15 Props That Are Tops With Stylists

In case your decorating is nearly there but still lacking a final touch or two, you may need some of the top props on . These popular items are the cherries on top of beautifully appointed rooms. Don’t get them twisted; these items are not only decorative or used solely by professional stagers. They’re things you will read, clean, prop your feet drink, munch on, brew tea in … and the list goes on. Have a peek at the way the pros are using these items in spaces around .

Monogram Appliances

Trough Sink

Pellegrino bottles. This is definitely the most common consumable product for a serious pantry, cupboard, fridge or kitchen counter tops staging. Running a close second are classic Campbell’s soup cans.

Clarkson Potter

Firewood. We’ve had the conversation about the damage firewood can perform many times, but we can’t help but be attracted to the familiar texture of split logs. Just be sure they’re bug free and truly dry before you bring them inside.

Have a look at stylish log storage for modern homes and for conventional homes.

Garrison Hullinger Interior Design Inc..

TV displays lit up with a classic. Stagers and inside photographers are paying close attention to what is on displays these days, while it is a Star Wars scene that goes with a space or a classic that can draw you into.

The Marion House Book

Sheepskin throws. Whether chucked over another carpet, a couch or dining seats, these soft shouts cozy up a space.

See more sheepskin cries in action

Bruce D. Nagel Architect

The Tom Ford publication. This fashion tome, published in 2008, is an archive of this amazing manner Ford chose a fusty old Italian firm and made it relevant again. Weighing in at over 10 pounds and giving off a strong black and white graphic, it is a go-to staging publication. If you want to provide your guests a jolt, leave it open to one of those sexy photographs.

Kelley & Company Home

Mrs. Meyers cleansing supplies. These products’ clever graphic layout is the very best thing to happen to laundry space staging because those Borax boxes worshipped by Warhol.

Normandy Remodeling

An Alessi teapot. This bag with pop art sensibility, designed by architect Michael Graves, is the number-one thing employed in kitchen staging. Running a close second is an eclectic conventional one by MacKenzie-Childs.

Sellars Lathrop Architects, llc

A KitchenAid standing mixer. While white and stainless are very popular, these frequently add one of those only pops of color to today’s white kitchens. Running a close second is a Le Creuset pot, as seen with this stovetop.

Suzie Parkinson SÜZA DESIGN

Dogs. Does anything make you more attracted to a space than an adorable pooch smizing at you? Of course, if you’re a cat person, replace puppy with cat.

Sharon Portnoy Design

Lemons. Fruit consistently packs a colorful punch. Don’t feel like these fruits are limited to the kitchen; you could point the dining table, console table or coffee table with a beautiful bowl of lemons, limes, oranges or apples too.

John Lum Architecture, Inc.. AIA

A Vilac car. This stylish toy car in France is 1 toy you will stand out in the open when you’re neatening up the home.

See more Vilac cars round the house

CONTENT Architecture

Orchids. Entryway consoles, coffee tables, dining tables and bathroom countertops can be enriched by these exotic blossoms. Second place goes to sunflowers.

Thom Filicia Inc..

Big leaves. If you are not into blossoms, consider using only one or two announcement leaves in lieu of a bouquet. Try to elephant’s ear or palm leaves for a coastal modern look.

Tara Seawright Interior Design

Leather creatures. These enchanting props add texture and are unexpected sculptures at a room. They also double as ottomans.

Debora carl landscape layout

A blazing fire pit. These not only look great but create wonderful outdoor spaces where you could warm up with your pals while toasting marshmallows.

See related

Fantastic Design Plant: Culver's Root

I started using Culver’s root for kicks. Thanks to its candelabra blooms loved by butterflies, good yellow fall colour and carefree growing, I have come to love this Midwest native and think about it a basic design plant. Leave this up through winter to give your garden a exceptional appearance; it also shelters winter birds and gives you seeds to glow readily at any time.

Benjamin Vogt / Monarch Gardens

Botanical name: Veronicastrum virginicum
Common name: Culver’s origin
Resource: Eastern Plains (Missouri River), northern Midwest and eastern Midwest to New England
USDA zones: 3 to 2 (find your zone)
Water requirement: Wet into medium-wet dirt
Light requirement: Full sun
Mature size: Slowly spreading clump to several feet broad; 4 to 5 feet tall
Gains: Insect magnet; exceptional spiked shape
Seasonal curiosity: Long blooming in midsummer; seems architectural in winter
When to plant: Spring to fall

Benjamin Vogt / Monarch Gardens

Distinguishing traits. It is a spooky plant in fall and winter. Culver’s root may be pecked at by birds on snowy afternoons and holds up amazing to powerful plains winds.

As the story goes, an early American physician found laxative properties in the plant. Do with that information what you will, but you understand why it is named Culver’s root and not Poopy Pants root.

Benjamin Vogt / Monarch Gardens

How to use it. Culver’s origin is excellent for a rain garden or some other low area in your landscape. Put it at the middle for a effect or in the back of a mattress.

Planting notes.
Butterflies, moths and bees swarm to blooms which look amazing during full moons. This really is an interesting easy and well-behaved Midwest which everyone should try. Dig it at any time, from early spring into late fall — even in winter in the event that you put several inches of compost on top. Scatter the seeds over bare soil in spring and you ought to get seedlings, too.

More about attracting butterflies and birds

See related

Experience the Holidays at Frank Lloyd Wright's Home and Studio

Every holiday season the Oak Park, Illinois, home of Frank Lloyd Wright is decorated as it would have been in the early 20th century. Led by “junior interpreters” and coordinated by the Frank Lloyd Wright Preservation Trust, half-hour guided tours “for kids, by kids,” based on this description, take visitors back in time to experience the house as it had been used from the Wright family during Christmas.

When: Saturday, December 8 and 15, 2012, from 9 a.m. to 11 a.m. (30-minute excursions)
Location: Frank Lloyd Wright Home and Studio, 951 Chicago Avenue, Oak Park, Illinois
Cost: Free. An adult should accompany children under 8.

Cynthia Lynn Photography

Throughout Wright’s time, strands of lights weren’t utilised to decorate the house’s exterior. Fresh green garland dresses up the windows and front entrance.

The outside design of the home illustrates Wright’s use of geometry in his designs.

Cynthia Lynn Photography

In 1889 Wright designed and constructed the home for himself and his bride, Catherine Tobin. The first floor contains the living room, dining room and kitchen, including the built-in benches that Wright introduced to contemporary home design. His use of built-ins created for deliberate, controlled seats; there wasn’t any need for additional furniture.

Cynthia Lynn Photography

Most homes throughout the 1890s were boxed in and closed off, but this entryway leads to a open floor plan. Wright chose to focus on a very simple design aesthetic and highlighted using horizontal lines.

Cynthia Lynn Photography

Large glass panels at the foyer allow light to the entryway, highlighting the open floor plan. The marble relief in the joint of this wall and ceiling was ordered from a catalog throughout the early 20th century.

Cynthia Lynn Photography

A reddish knitted scarf and mittens from the front door offer a subtle reminder of this holiday season.

Cynthia Lynn Photography

Catherine would make each of the fresh, natural arrangements for your holidays. The couple often placed presents for the children on the seats built into the fireplace inglenook.

Cynthia Lynn Photography

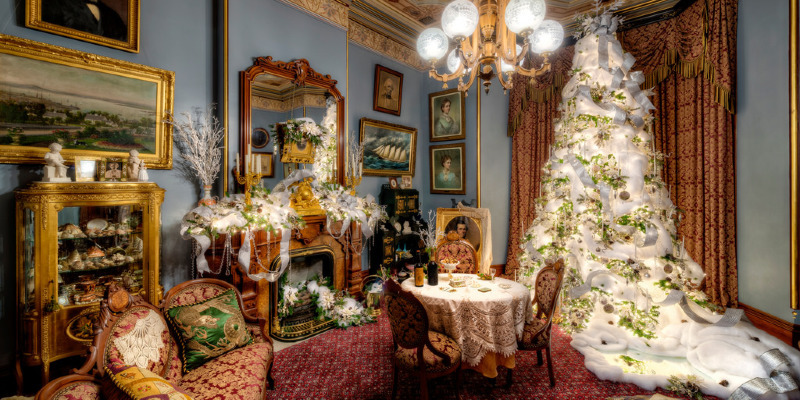
As the family grew, the need for more space became apparent. Wright transformed the kitchen to this formal dining room during a major renovation in 1895, designing the dining room for a space within a space. The proper arrangement of this light fixture centers the room, while the high chair backs define the dining area. Two of the eight chairs are original and have never been restored.

A merry goddess, also generally made by Catherine, sat at the middle of the dining table throughout the holiday season.

Cynthia Lynn Photography

The second-floor playroom, inserted throughout the 1895 renovation, is where the children learned to play devices and place on musicals.

It was normal for a grand 12-foot tree to be in the middle of this high-ceilinged room throughout the vacations. Wright disliked attics and basements and chose not to set them in his property. The family lit the trees with candles, and the children weren’t allowed into the room until Wright was completed lighting the tree. A bucket of water was constantly put next to the tree in the event of a fire.

Cynthia Lynn Photography

Wright often wrapped little gifts in large boxes to throw off the children course. Unlike the oversize boot-like stockings seen and used today, actual stockings hung over the fireplace.

Cynthia Lynn Photography

Relatives would often gather around the tree through the holidays to dance and sing. The children performed from the gallery over while guests observed from below.

Handmade garlands made out of popcorn and cranberries were typical decorations of this time.

Cynthia Lynn Photography

Together with the growth of his loved ones and his home in 1895, Wright forfeited his very first home studio and made it into two bedrooms to his children. A wall split the space into boys’ and girls’ rooms, and the children shared with the rooms, but not all six inhabited the rooms in the same times. Due to this children’s age differences, some were away in boarding school while others were in the home.

Cynthia Lynn Photography

Here we see that the Wright design aesthetic of removing the loft and expanding the ceiling. The dividing wall of the children’s room was lofted rather than brought all the way to the top.

Cynthia Lynn Photography

Cynthia Lynn Photography

The children decorated their rooms with handmade paper snowflakes and colorful paper chains.

Cynthia Lynn Photography

The corridor to Wright’s studio was part of this addition in 1898. The hallway was constructed around an existing tree, later eliminated; a replica of this tree along with a photograph remain in the space. To the left is the entryway to the first degree of this studio, and straight ahead is a set of stairs leading to the second-floor balcony.

Cynthia Lynn Photography

The two-story studio was the first of its type to house architects and designers in one space. The marrying of the two gave way to a number of the greatest designs of Wright’s time, including the Robie House, along with the arrival of the Prairie style of architecture.

The decorative chains at the studio weren’t just decorative but also structural. The horizontals held the walls with each other, along with the verticals maintained the balcony raised. Subtracting beams to your balcony created more space.

Throughout the vacations Wright also decorated his studio with a lot of his kids ‘ paper chains.

Cynthia Lynn Photography

Throughout the excursions on December 8 and 15, 2012, the Frank Lloyd Wright Trust Preservation allows children into the studio to play with Froebel blocks. These distinctive blocks influenced Wright’s use of geometry in his design.

Cynthia Lynn Photography

Wright consciously chose to have a studio in your home to make his work life nearer to his life.

Cynthia Lynn Photography

Wright often opted to purchase all of his six children the exact same gift — bicycles, musical instruments — presumably to avoid disagreements.

Cynthia Lynn Photography

On screen during the excursions are presents that the children may have received from Wright.

Cynthia Lynn Photography

The kitchen was also extended throughout the 1895 renovation and is staged the way it could have looked for the Wright family. A turkey was served for Christmas dinner, and the children made candies and cookies from the kitchen. Not all the pieces in the room are first, but the setting offers a fantastic notion of how it might have looked throughout the holiday season.

Cynthia Lynn Photography

Cynthia Lynn Photography

The outside of the studio can be decorated with an easy, new garland.

Cynthia Lynn Photography

The facade of this studio is rather different in the home. Wright wanted to make sure that when clients entered, they were entering his studio rather than his property. He’d fulfilled his desire to become near home, but he wanted to make certain company had been maintained company.

Cynthia Lynn Photography

More: What Frank Lloyd Wright’s Own House Tells Us

See related

16 Great Ways to Use Living Room Corners

Within our never-ending search to make the most of every square inch of space around the house, we’re looking into the corners. Corners can be occupied and used or totally awkward and wasted. Remove the awkward and be sure your corners are working you as best they could. We have taken a look at corners in the kitchen; today we’re moving on to corners in the living room and living area. Whether you want a small furniture layout help or are planning a remodel, then there should be a notion here for you.

Prentiss Balance Wickline Architects

Open the corner entirely. The line between inside and outside disappears with doors that open a corner.

What is happening on your living room or family room corners? Please share your ideas in the Remarks. section.

Mary Prince Photography

Nestle in a sectional. Let us start off only. Sectional sofas were produced for corners. In fact, the corner spot is normally the comfiest, most coveted spot for lounging. In a little room, comfy that sectional into the corner. Another plus for this layout is that you might cable in some reading lamps into the walls over, which would conserve floor space that floor lamps and combos of tables and table lamps could otherwise occupy.

David Vandervort Architects

Put the hearth on a angle. Don’t make a hearth along with a huge perspective compete for the name of number-one focal point; unlike any Baby, your fireplace or wood stove will not mind being placed in the corner.

See more corner fireplace notions

LDa Architecture & Interiors

The corner fireplace also functions in an area that does not have a view. Art and lighting overhead finish this off fireplace as a major element within the room.

Archer & Buchanan Architecture, Ltd..

Produce a comfy nook. This cozy cabin’s hearth place includes a secret…

Archer & Buchanan Architecture, Ltd..

… tucked just past the fireplace is a cozy reading nook, complete with storage plus a window. Next time you think,”Ugh, awkward spot,” immediately switch gears ,”Wonderful opportunity for a comfy corner!”

Stonewood, LLC

Position the TV to get subtlety. The layout of this room is a fantastic solution for those who don’t need the TV to dominate the room. The TV’s positioning lets the fireplace be the focus.

The Red Jet

Here’s a very different spin on the TV in the corner.

See the rest of this home

Erika Bonnell Interiors

Make a big statement with a room screen. Art is great, but it might get lost in a corner like this . In case your corner has a case of the blahs, add height, dimension, texture and geometry by angling an area screen there.

Amy Lau Design

Ground a sculpture. All these superb driftwood logs enliven this shore house corner.

Incorporated

Bring in some life with a plant. High-rise homes often have large columns that can make the corner space even more awkward. In this house a tall plant adds a wild form and large sprigs of green into all the clean, contemporary lines and neutral colors.

Designate a spot for reading. A comfy seat, a side table and a reading lamp are all you have to create a favorite spot.

Kate Byer Interior Design

Invite intimate conversation. Two seats flanking a round pedestal table or a octagonal one create a helpful space inside a bigger room.

Meyer & Meyer, Inc..

Take a banquette for a huge living room or dining room. In large bedrooms, corners offer an opportunity to create a tiny room inside the room. A seating area like this you can inspire an afternoon tea convention, or host a continuous game of chess.

Hang a mirror above a console table in the corner. This vignette makes elegant use of a little corner. The mirror adds depth and reflects light.

Jennifer Grey Interiors Design & Color Specialist

Employ a corner cupboard. Great for hiding or display media equipment, an armoire like this one helps anchor the living room, and draw attention away from the entryway area.

Talianko Design Group, LLC

Maximize storage with a corner bookshelf. Whether you’re a bibliophile or wish to exhibit a set, then a corner shelf cozies a comfy, overstuffed room (I mean”overstuffed” in the best way; believe sinking into cushions).

Whitehall Interiors & Home Staging

Speech the corner with architecture. These last few big moves are for those who are planning new construction or a remodel. Consider built-in shelves to your corners. Be sure to include lighting them on your plans.

Dick Clark + Associates

Talk to your architect about contemporary corner windows. Expand the view with a dramatic corner window.

See more corner window notions

See related

Show Us Your Own Holiday Mantel

Festive ers, please reveal your vacation mantels! We’d love to see the way you decorate round the fireplace. Do you hang your sleeves there, and if yes, how? Do you have access to magnolia and boxwood branches, or is it strictly fir and pinecones for youpersonally? Are lights involved? Please inform us about and post pictures of your vacation mantel from the Remarks section below. Your pictures might be utilised in a future ideabook on .

Tobi Fairley Interior Design

Interior designer Tobi Fairley incorporated oranges and lemons into this festive mantel garland.

Hydrangea Home

This decorator has curated a beautiful mantel that combines greens and household decorative objects, such as a fluted bowl, a charming little bird and a distressed box, all which tie together via their creamy white hues. The result is a country look that is complex.

Sandra Howie

This mantel produces a holiday sense without having any evergreen trimmings. Designer Sandra Howie says she likes to create a mantel in her home that “is equally very simple and sparkly with a bit of rustic and also a bit of modern.” She’s picked a beautiful palette of textures and arranged them in a balanced manner.

So, ers, reveal ’em if ya got ’em! Please discuss your personal holiday mantels with everyone in the Comments section.

See related

Make a Powder Room Accessible With Universal Design

Including a powder room on the primary level of your house ensures that anyone, regardless of age and mobility, has access to a sink and bathroom without needing to climb stairs. At a two-story home, a powder room or a complete bathroom on the main level can be important if someone sustains a serious accident or a progressive disease takes its toll. It ensures everyday grooming tasks, some of which we might take for granted, can continue without interruption and embarrassment.

A closet-size powder room carved out from under the stairs might perform in a pinch, but one which size is generally too small to accommodate those with mobility apparatus. In case you’ve got the choice of including on or remodeling, then consider making the powder room at least 60 inches wide and 60 inches deep, with a bathroom and sink counter tops from each other. This permits the minimum code 30-inch area for the bathroom and a 30-inch area on one side of the bathroom for those needing transport help. As necessary, these tips will probably need adjustment depending on the user. Should you have the space and the budget, then a complete size bathroom on the main level is the thing to do. This provides the flexibility from the off chance that you or a loved one does sustain a major injury, and can no more get to a different level.

Richard Bubnowski Design LLC

Accessing the powder room is the very first hurdle. Aim for doors which are minimal of 34 to 36 inches wide to ease mobility aids, like wheelchairs and walkers. Pocket doors operate well, because they do not occupy any room in the powder room or in the hallway, allowing for maximum floor area for simple navigating.

When there isn’t any room to expand the doorway opening, and a swing door is the only choice, consider installing swing-away hinges to make the most of opening and getting the door open in the bathroom. These attributes can allow for the necessary room for someone to turn around without needing to close the door.

Galaxy Sales, Inc. (Manufacturers Representative)

Weslock Door Hardware

For conventional swing doors, opt for lever handles. People with arthritic hands or limited dexterity can operate lever handles a great deal more easily than round hinges or latch-type handles, which need more stress to grasp and turn.

Stratton Design Group

Based on the kind, vanities can provide much-needed storage in a small room. Wall-mounted vanities, depending on the elevation of the cupboard, provide leg clearance for those in wheelchairs. Pedestal sinks also do the job nicely. This vanity with angled sides provides more floor area for individuals navigating with a wheelchair or walker, and is located far enough from the doorway to minimize obstacles.

LACAVA

ADA-Compliant Libera Vanity

Vanities which have a slanted front — like the Fairmont Design T&C ADA Wall Mount Vanity or this Lacava Libera vanity — provide higher flexibility for wheelchair users, as they allow them to get nearer to the fixtures. The cosmetic slanted cover for the plumbing means users will not get burnt by hot plumbing, and there is bonus storage area.

Archipelago Hawaii Luxury Home Designs

When space is limited or you need higher clearances, a pedestal sink might be the way to go. Pedestal sinks offer you the user, especially those in a wheelchair, a simpler approach from the front or the side. It might also allow space for someone else to stand nearby. Pedestal sinks also offer you undersink space to keep a step stool close at hand for toddlers and young kids.

W.b. contractors

A vessel sink, possibly sitting on the countertop or counter into the countertop, can provide design and accessbility choices. Leaving the space open under the counter allows for leg clearance for all those in chairs. Modifying the depth of the counter permits users in wheelchairs or tiny kids to reach the fixtures easily. Also consider the elevation of the general countertop and bowl, and adapt to match users of varying heights.

Stratton Design Group

Elect for a comfort-height bathroom, usually two inches taller than a normal bathroom, to make transferring from a wheelchair simpler. Allow enough clear floor area on one side of the bathroom for those who need a transfer or need a place to park their walker. Aim for at least a 30-inch width along with a 48-inch length on one side of the bathroom. Additionally, this allows room for an aide. And do not forget to add grab bars at the back of and on either side of the bathroom for both the consumer’s and assistant’s security.

See related

Pacific Northwest Gardener's November Checklist

November is the final month to prepare the garden for winter. It’s rather like tucking kids into bed at night: They’ve played all day, and now they’re tired. There is the bath-time ritual, followed by a quiet story before they float beneath the quilt for many blissful hours of relaxation — for both of you personally.

The backyard has been playing hard and growing for more than eight months. Now it’s time to have it clean and tidy until its winter break. Only a few hours spent in the garden this month will make certain you equally reach spring with renewed vigor and enthusiasm.

Le jardinet

Keep gathering those leaves. One of the gorgeous aspects of fall is that the wonderful tapestry of autumn leaves is woven over a span of many months. Shades of crimson, amber and gold come and go as each tree and shrub requires its turn in the spotlight. For all of us, but it means that only when we thought we had finished sweeping up leaves, we must begin all over again. Consider it your November work out, grab your roster and gather nature’s black gold just as you did a month.

Jocelyn H. Chilvers

You’ve got many options: Insert leaves to your compost bin, then shred them with the mower and reapply them to a shrub edge as winter mulch or subtly corral them into a wire cage somewhere handy so you can spread them next year when they’ve decomposed into rich, dark mulch.

AW POTTERY

Protect your water features. A number of us are procrastinators, and some of us are just plain forgetful. This photograph shows what happens to fountains during a hard freeze either way.

To avoid creating such dramatic ice sculptures, remember to drain tiny fountains and either store them in the garage for winter or pay them to avoid water freezing and entering. Small submersible pumps will also be best removed and kept indoors until spring.

The Pond Pros Of Southern California

Larger ponds and waterfalls may have a sufficient volume of water cascading through them which the entire body of water won’t freeze, and the pump is either too deep to be affected or is in a secure enclosure aboveground. If you are uncertain, contact your regional pond supply firm for advice.

Jocelyn H. Chilvers

This is also the time to winterize your irrigation method. We utilize a very simple drip watering system for many of our containers in addition to for our vegetable garden. The hoses can be left in position, but we disconnect the battery-operated timers and bring them inside for the winter.

Landscape irrigation firms usually offer you a winter service to empty the lines if needed — contact them now.

Margie Grace – Grace Design Associates

Take care of your roses. Traditionally, rose pruning is performed in early to mid-February, but I also like to do a mini prune at this time of year — especially to taller roses.

I eliminate as much as a quarter of this rose height to prevent”wind rock.” In exposed areas taller roses can be vulnerable to being pushed around by strong winter storms, creating huge gaps in the soil level, which can then enable freezing rain, ice and snow to reach the roots. Lowering the height of the roses a little can prevent this.

Do not worry about cutting to an outward-facing marijuana, as you’ll be pruning correctly in spring.

Carolyn Chadwick

I also apply several inches of good compost around the base of the roses as a winter blanket, not to be eliminated until the next growing season.

FRONTGATE

simplehuman Stainless Steel Compost Pail – $59.50

Insert a few inches of compost. I’m a lazy gardener. If I apply compost to the garden today, the rains will help its nutrients leach into the soil, and the worms will till it while I’m nice and comfy indoors. Some gardeners prefer to mulch in spring. If your garden soil is in poor shape, I recommend adding compost in both autumn and spring for three decades and then once a year after that. Both seasons have their own pros and cons, so make it work for your schedule — just do it!

An appealing compost pail, like this one, will place food scraps to good use and lessen the number of treks out to the backyard compost bin.

Grow hardy edibles. It’s very satisfying to collect your vegetables in winter. Leeks, parsnips, cabbage, kohl rabi and Brussels sprouts are simply a few of the simple cool-season crops that could withstand winter chills. Provide a layer of floating row cover or a cold frame, and your options expand to add carrots, lettuce and much more.

Le jardinet

If that seems like too much work, at least maintain an herb pot by the back door so it is possible to add some fresh parsley or rosemary to match your winter dishes.

Le jardinet

Set up a container garden. Together with the scents of hot apple cider and homemade pumpkin pie wafting through your house, you know it won’t be long before friends and neighbors stop by. Welcome them with a vibrant container garden in your porch or patio.

It’s simple to spruce up existing plantings by tucking into a vibrant pumpkin or seasonal accent one of the foliage.

Terra Nova® Nurseries, Inc

Starting from scratch? Look for warm-colored foliage — coral bells (Heuchera) are a great choice and come in a number of colours, from lime to mahogany, because you can see in this photo.

Among my current favorites is ‘Delta Dawn’ (centre ), which is a wonderful colour of buttery yellow accented with rosy hues.

Le jardinet

The fall fern (Dryopteris erythrosora) is just another mainstay for autumn, using its fronds turning to shades of copper as temperatures drop.

To get just a little pizzazz, ‘Goshiki’ false holly (Osmanthus heterophyllus‘Goshiki’), shown here, can be depended on for good color in sun or partial shade. Its holly-shaped green and yellow variegated foliage partners well with vivid gold conifers and vibrant heathers.

Le jardinet

Become a kid again. I visited a pumpkin farm last weekend. I felt a bit silly really. There were all these young families with excited toddlers on a treasure hunt to find the perfect pumpkin to carve, tottering through the rustling corn maze and playing on the old tractors. I began to wonder whom I could”borrow” a kid from!

But of course you are so old as you feel. So you’ll find me crawling through the gourd tunnels, looking for the wartiest pumpkin and kicking through the leaves with the kids.

Fall is for pleasure — have a superb month.

More guides to Pacific Northwest gardening | Locate your U.S. garden checklist

See related

Great Design Plant: Donkey Spurge

Donkey Spurge is not the nicest of titles, but the plant is quite pretty in its own quirky way. It’s a wonderful gray-green, with a lovely blue tint that combines with everything. The surprise in spring is the lime-green shirts that celebrate new expansion as well as any spring tulip.

Join me as we discover this wonderful plant that’s been saddled with such a poor name and try to give a little more credit where credit is due.

Caution: When the plant has been broken, its milky white sap may cause a rash somewhat like poison ivy. Keep children and pets away and use gloves when coping with it try not to break the stems.

Dig Your Garden Landscape Design

Botanical name: Euphorbia myrsinites
Common name: Donkey Spurge
USDA zones: 5 to 9 (find your zone)
Water necessity: Low; requires good drainage
Sun necessity: Full sun to light shade
Mature size: 14 inches high and 12 inches wide
Development rate: Moderate
When to plant: Spurge is tough, so it may be transplanted at any given time of year. I love to transplant it in early fall, so it can get established in time to put on new new expansion by spring.
Advantages and tolerances: Drought tolerant; spring color; blue foliage
Cautions: The sap may cause skin irritation and be toxic if ingested. Donkey Spurge is considered invasive throughout many nations in the American West.

Amy Renea

Spurge also makes a great indoor plant over winter, as long as it is kept out of reach of children and pets. Try it in a hanging basket.

Verdance Landscape Design

The best way to use it. Spurge’s blue color (far left) is just beautiful in almost any garden and is a fantastic counterpoint to the masses of all green plants in a traditional cottage garden.

Amy Renea

I used spurge in this enjoyable and unique hamster wheel, but unlike thicker succulents, spurge lasts just a few weeks within an arrangement.

Amy Renea

Spilling over the edges, spurge creates a great waterfall or tracking plant for any bud or structure.

Amy Renea

Please do not plant spurge in the West, where it is invasive, but do consider it for different gardens to get a shot of quirky motion, a bit of blue along with an excellent show every spring. It’s a wonderful plant worth researching, although it may be known as Donkey Spurge.

See related